Celebrating Easter usually means a chocolate filled long weekend, and this year should certainly be no exception. The only downside to a chocolate filled Easter is eating your body weight in processed sugar! Why not go sugar-free this time around?
Take everyone’s taste buds by surprise with these delectable chocolatey and sugar free Easter treats. We’ve got the ultimate sugar-free Easter lineup including the delicious traditional desserts like Classic chocolate Easter eggs, hot crossed chocolate scones, chocolate cake, chocolate hedgehog slice, cutout cookies, and coconut chick cupcakes!
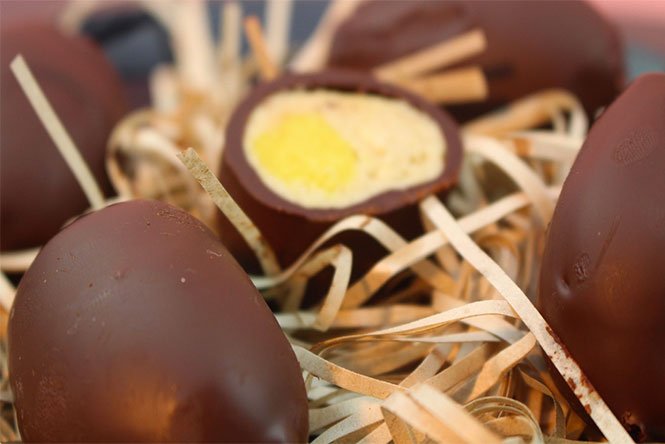
Vegan Chocolate Easter Eggs
(with homemade cashew & coconut butter)
Ingredients
1/3 cup coconut butter
1/3 cup cashew butter
1/4 cup Natvia
1/2 tsp vanilla essence
1/4 tsp turmeric
1 tbsp coconut oil
Coating:
1 cup melted sugar free dark chocolate
Method
1. Add 1/3 cup of coconut butter and 1/3 cup cashew butter into a large mixing bowl
2. Add 1/4 of Natvia to the mixing bowl with both butters.
3. Add 1/2 tsp vanilla essence and mix until combined
4.Spoon 1/4 cup of this mixture into a separate bowl.
5.In the separate bowl, add 1/4 tsp turmeric whilst stirring gradually.
6. Add 1 tbsp of coconut oil to the mixture and stir until well mixed.
7. Chill both bowls of the mixtures in the fridge for at least 10 mins.
8. Once chilled, flatten 1 tbsp worth of the plain mixture into a ball and place 1/2 tsp of the yellow turmeric mixture in the center of the ball and fold the plain mixture around so that the yellow mix is enveloped by the plain mixture.
9. Roll into an even egg shape and cover with plastic wrap. Repeat for the rest of both mixtures.
10. Place the finished plastic wrapped balls in the freezer for at least 30 mins.
11. Whilst the eggs are in the freezer, melt 1 cup sugar free dark chocolate and set aside.
12. Using a skewer, cover the firm eggs in melted dark chocolate, place back in the freezer to set.
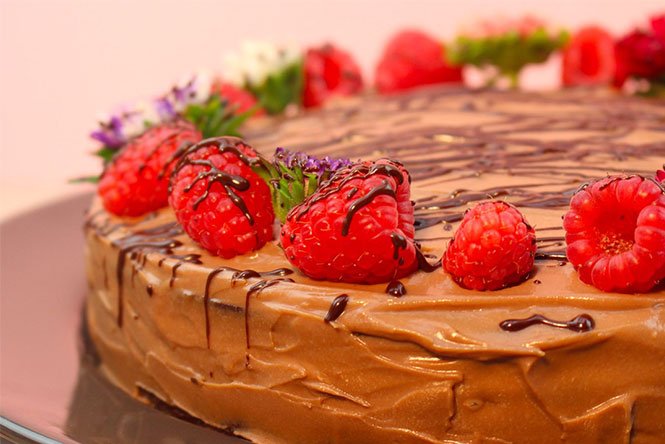
Simple Chocolate Cake
A classic chocolate cake with a sugar free spin that is simple and easy to make.
What is also special about this recipe is that it also uses Greek yogurt and sugar free chocolate as the frosting! This is truly a simple and great way to have a standard old chocolate cake, but for once you can get excited about it without the guilt, and without the sugar!
Ingredients
1 & 1/4 cup self raising flour
1/4 cup cocoa powder
225g butter
1/2 cup Natvia
1 tsp vanilla essence 2 eggs
1/4 cup of milk
pinch of salt
Greek Yogurt Frosting:
1 cup Greek yogurt
180g sugar free melted chocolate 1 tbsp Natvia (to taste)
Method
1. In a bowl, combine the 1/4 cup self raising flour, 1/4 cup cocoa powder, 1/2 cup Natvia, 1 tsp vanilla essence, and 225g melted (cooled) butter.
2. Add the eggs and mix until combined
3. Pour into a lined cake tin and bake for 25 – 35 minutes at 160°C.
4. Check the cake and if it has sprung back, then it is cooked and does not need to be in the oven for any longer. If it is still too wet, keep it in the oven and keep an eye on it. Don’t overcook the cake!
5. Mix the 1 cup of Greek yogurt, 180g of sugar free melted chocolate, and add 1 tbsp of Natvia to taste.
6. Once mixed, set the frosting aside.
7. Once the cake has cooled, spoon the frosting over the top and enjoy a simple sugar free chocolate cake!
Hot Cross Cacao Scones
Why does everyone go crazy for hot crossed buns for Easter when you can make hot crossed anything-you-like? These hot cross scones are the perfect Easter treat to set you apart from the lovers of buns.
A healthy alternative to chocolate scones, or hot crossed buns, or hot crossed chocolate bun scones? Who cares! They are delicious and include a bit of orange too!
Ingredients
1 & 1/4 cups wholemeal flour 1 & 1/2 tsp baking powder 1/2 tsp salt
2 tbsp unsalted butter
1/2 cup greek yogurt
3 tbsp Natvia
2 tbsp + 2 tsp non fat milk
1 tsp nutmeg
1/2 cup sugar free chopped dark chocolate + extra for drizzling Zest of half an orange
1/4 cup cacao
Method
1. Preheat your oven to 220°C and line a baking tray with baking paper and set aside.
2. In a mixing bowl, whisk together the flour, baking powder,
3 tbsp Natvia, orange zest and salt. Cut in the butter and mix together until it resembles fine crumbs. Stir in the Greek yogurt, 2 tablespoons of milk, and the vanilla.
3. Add in 1/2 cup worth of the dark chocolate chips and stir.
4. Sprinkle some flour down and shape the dough into a large circle then slice it evenly into 8 portions.
5. Once in the portions, roll each of the slices into smaller scone sized shaped balls and place on the baking paper.
6. Prepare the scones by brushing them with the remaining milk (give them a good coating).
7. Bake the scones for 17 – 20 minutes or until the tops are golden.
8. Melt the remaining dark chocolate and drizzle crosses over the tops of the baked scones.
9. Enjoy a hot crossed chocolate orange scones treat for Easter!

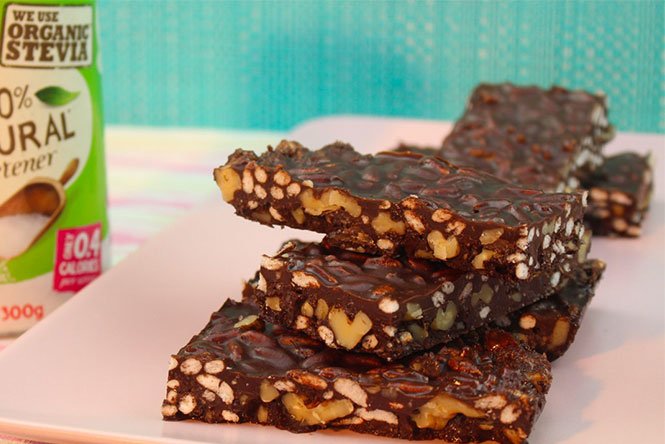
Vegan Hedgehog Slice
A classic chocolate hedgehog slice made without sugar, but wait, it is also vegan you say? This is a perfect Easter treat or for any time of year. Everyone loves a simple hedgehog slice, especially when it is vegan.
This recipe is sugar-free, made with Natvia 100% natural sweetener as well as using only sugar- free chocolate. A healthy alternative to an animal-product filled hedgehog slice (no, not literal hedgehogs).
Ingredients
1 cup walnuts
2 tbsp cocoa
3 tbsp desiccated coconut
1 cup puffed rice
1/4 cup Natvia
1/4 cup melted coconut oil Topping
150g sugar free dark chocolate
1 tbsp coconut oil.
Method
1. Line a loaf tin or baking tray of your own choosing with baking paper.
2. Roughly chop the walnuts and place in a large mixing bowl
3. Also add to the mixing bowl; Natvia, cocoa, coconut and puffed rice.
4. Stir together and mix until combined.
5. Add 1/4 cup melted coconut oil and stir again.
6. Spoon this mixture evenly into the baking tray that you have chosen.
7. Melt the dark chocolate, along with 1 tbsp of melted coconut oil.
8. Pour the melted chocolate evenly over the packed baking tray of hedgehog goodies.
9. Spread evenly and place in the freezer for at least 10 minutes before serving.
10. Enjoy a crunchy vegan chocolate hedgehog (not the animal!) slice.
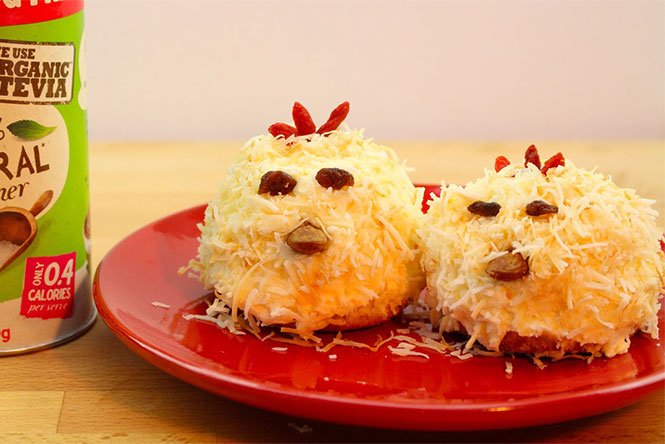
Coconut Chick Cupcakes
Coconut covered baby chick cupcakes. These are not actual baby chicks but more so angry birds, either way they are a great Easter treat made without sugar. This is a sugar free cupcakes recipe, that is also gluten free! Go Gee Ef crazy for some sweet gluten free coconut covered cupcakes this Easter!
Ingredients
4 cups shredded coconut 2 cups almond meal
1 cup desiccated coconut
1 tbsp baking powder
1/2 tsp salt
170g unsalted butter, softened
1/4 cup melted coconut oil
1 cup Natvia
Finely grated zest of 1 lemon
3 large eggs
2/3 cup buttermilk
2 tsp vanilla essence
Vanilla Frosting
100g unsalted butter, softened
1 cup powdered Natvia (blend normal Natvia)
1 tsp vanilla essence
1/4 milk (add small splashes only for consistency)
Method
1. Preheat oven to 175°C and spread baking paper on a lined baking tray.
2. Toast the shredded coconut for 10 mins or until slightly browned. Set aside.
3. Beat 170g butter in a large mixing bowl.
4. Add 1 cup Natvia to the butter and continue to beat together until fluffy.
5. Grate the lemon into the bowl and evenly stir it into the mix.
6. Add the vanilla essence and stir.
7. Add 3 eggs whilst continuing to beat the mixture.
8. Add the desiccated coconut, almond meal and buttermilk whilst stirring.
9. Prepare a muffin tray with muffin cups and use vegetable oil to spray the muffin cups.
10. Spoon the cupcake mixture into the muffin cups and bake them in the oven for approximately 20 minutes at 175°C or until golden brown.
11. Let the muffins cool on a wire rack for 10 mins.
Vanilla Frosting
1. While the cupcakes are cooling, beat 100g of unsalted butter in another mixing bowl.
2. Using a blender, blend 1 cup of Natvia to make it finer.
Add this to the butter and continue to beat. Regular granulated Natvia will not work for the icing, you must use Natvia icing mix or simply blend regular Natvia in a food processor first.
3. Add 1 tsp vanilla essence and stir, whilst also stirring in small drops of milk for consistency.
Don’t add the entire 1/4 cup of milk, simply add small amounts until the desired icing consistency has been reached.
Finale:
1. Coat the finished cupcakes in the vanilla frosting evenly around the whole surface.
2. Dip and roll the frosted cupcakes in the toasted shredded coconut set aside in step 2.
3. Decorate faces on the coconut chick angry bird cupcakes with goji berries, sultanas, and almonds!
Easter Cutout Cookies
These are a classic Easter cookie treat to share with grandma! A simple cookies recipe that are also sugar free. These cookies have special Easter shapes and colors to satisfy your long weekend baking urges.
Ingredients
85 grams of unsalted butter 1/2 cup Natvia
1 large egg
1/2 tsp vanilla essence
1 & 1/2 cups all-purpose flour 1/2 tsp baking powder
1/2 tsp salt
pinch of salt
Icing:
1/4 cup Natvia icing mixture (or blended Natvia) 2 tsp vanilla essence
Milk (add until consistency is correct)
Method
1. Preheat the oven to 175°C.
2. Add the softened butter to the mixing bowl and add 1/2 cup Natvia.
3. Beat the Natvia and butter until fluffy.
4. Add 1 egg and vanilla essence & continue to beat.
5. Add the all purpose flour, baking powder, and pinch of salt and stir it through the mix.
6. Once mixed and like dough, sprinkle flour down and roll the dough into a ball and then cover with plastic wrap and place in the fridge for at least 1 hour.
7. Sprinkle another lot of flour on appropriate surface and take the dough out of the plastic wrap.
8. Roll the dough flat with a rolling pin.
9. Once flat, use your cookie cutters (preferably Easter ones!) to cut out as many cookie shapes as you can and place them evenly on a flat baking tray with baking paper.
10. Bake for approximately 8 – 10 minutes (depending on the size of your cookies).
Icing:
1. Whilst they are baking, make the icing by adding 1 cup of Natvia to a new mixing bowl.
2. Add approximately 2 tsp of vanilla essence and 1/4 milk whilst continuing to stir.
3. Continue to add more milk until the consistency is correct.
4. Separate the icing into 4 bowls add food coloring of your own choice to each bowl and stir each one.
5. Once mixed, pour the icing from each bowl into an easy squeeze bottle and apply to the cracks of the baked and enjoy coloured cookies once set in the fridge.

Feature image via pinterest


