 We all want a little more lift in our life, especially when it comes to our face! Whether you are young or on the mature side of life, a little extra sculpting can be the difference of a lifetime in makeup terms, but how do we know when we have gone too far?It can be a fine line…After all, we are not all celebrities with constant cameras in our faces, so making our fake perfect bone structure look natural is the key to working these sculpting techniques into our daily routine!
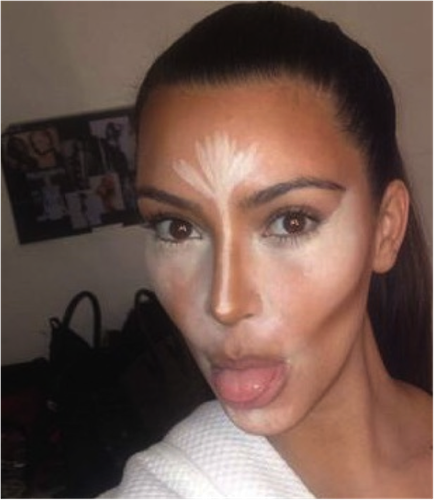
Late last year Kim Kardashian released pictures on her blog of herself during makeup with her makeup artist, Scott Barnes, showing an extreme look of how he contours Kim’s face.
The pictures showed a very old school way of contouring using lots of white highlight, mixed with some shading, with another picture of Kim released once all was blended out to reveal the final, very sculpted look.
It really opened up a lot of discussion on contouring and how it works, but more importantly, how can we use it in our everyday lives.
Let’s take a look at a standard Contouring, or Highlight and Shade diagram…
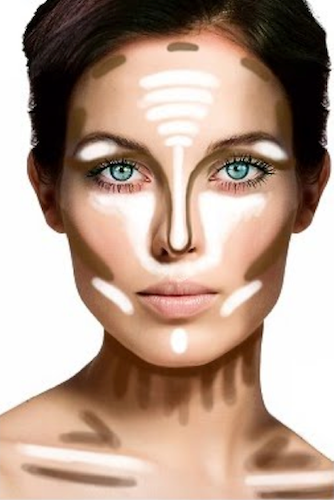 If you are a makeup artist, the above image is nothing new. You are taught very early on that the key to more lift, shape and general colour rules all comes down to highlight and shade.
For a celebrity like Kim K, this is an everyday look as she is always in the spotlight and once you see yourself all contoured up, well… it does look good!
As you can see, the areas you highlight are that of the frontal bones, think of where you would get sunburnt first.
By highlighting these, you make them come forward and appear larger as anything light in colour can do.
The opposite to that is shading, any darker colour than the highlight will recede the area away or further back and this is applied on the hollow areas of the face, or under the bone areas.
Shading is how most of us in a day-to-day makeup routine can create lift with small amounts. Pretty much think of a shade colour as an eraser, if you don’t like something on the face, using a dark colour will hide or make it smaller.
The greater the highlight and shade, the more contrast you will get, creating a very sculpted, lifted and shapely bone structure – it is actually amazing how much the face can be transformed with the right colour tones used.
MB Pro Tip – The same principal with highlight and shade goes with textures of matte and sheen. The more matte a colour is the less reflction you will have, meaning the area will not come forward as much, but if a product has light, or shimmer through it, the area will appear that little bit more larger.
The old school way, like in Kim K’s place, was to apply in a cream texture, highlight and shade before the foundation, so you can really sculpt and re-structure the face at the start of makeup.
Once foundation is applied over the top, it all blended together, but still leaving definite highlight and shade points coming through the look, to then apply colour and extra highlight and shade as a finishing step.
These days, we have so much more bronzer, shading type products, plus a lot more skin highlighters in cosmetics that contouring has become a daily routine and not just for makeup artists at a photoshoot.
I think everyone should understand the principles of contouring and that where you apply a light or dark, shimmer or matte product will definitely change the face structure and applying in the incorrect area will not look balanced.
Applying a dark lipstick on thin lips, or applying shimmer eye shadows on puffy eyelids for example can be a disaster!! But, if you know when and why to apply a certain colour on an area, your makeup will always be balanced and lifted.
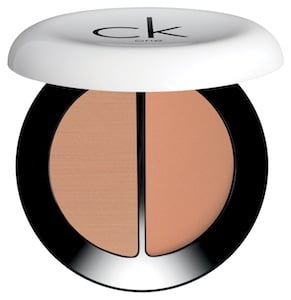 Your trusty bronzer can do wonders for an everyday ‘fake’ bone structure look. My fave is the ck one color duo bronzer (RRP $45) as it has one half powder and one half cream.
Apply the powder side under cheekbones to sculpt and lift and even across eye sockets as a base for other shades or alone – its that simple, try it on one side of the face to see how much a shade colour can lift your look. Then for greater results, meaning more sculpt, use the cream version in the same areas first, this can be worn alone, then apply the powder over the top of the cream for more intensity.
Like everything, this contouring technique using bronzer in the hollows to create a lift only works best with balance, meaning adding highlight on the bone areas. Highlighters have been a huge influence in makeup over the last few years, giving light to faces, creating lift – especially when used as a contrast against a shade tone like a bronzer and just in general making skin appear more realistic.
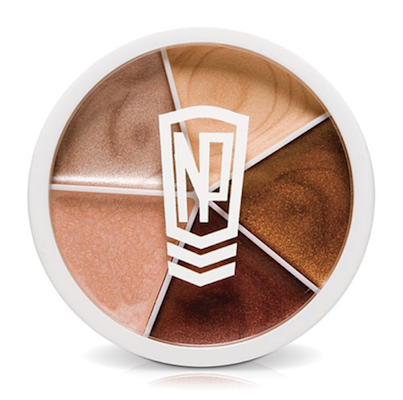 My fave highlighter is the Napoleon Perdis Light Patrol (RRP $70) wheel! I love that I have the option of silver, pearl, gold tone highlighter and I can mix them all together or use separately. I also love having a bronze style highlight, great as a wash over the eyelid or a highlighter for a darker skin tone and the berry highlight is a great cream blush, lip stain or once again a highlighter or colour for darker skin tones – so multi-use!
I usually always, in every makeup I do, apply a small amount above cheekbone to create that lovely fresh glow on the skin.
Apply a little to under the brow, cupids bow for a larger pout, perhaps on the chin if you want to bring forward that area and centre of nose is great too.
Basically, follow the contouring diagram above and have a play with highlight and shade tones to work out what works best for your face structure. Fake it till you make it, but remember, you must have balance from highlight to shade. Then once you get the complexion right, add colour, still remembering that matte colours are like shading and shimmers are like highlighting!
Good Luck ladies, lets bring those cheekbones out Kim K style this weekend – ok maybe a little more natural than Kim. 😉
By Michael Brown
Twitter: @mbrown_beauty
Facebook.com/michaelbrownbeauty
